This section is directed only to installations where client workstations will be arranged in a network configuration with a server running Novell Netware.
The Typequick client applications (TQClient and TQAdmin) cannot be run on a Netware server, only the Resources and TQServer may be hosted on a Novell Netware Server provided the server is running the Novell JVM 1.4 (or higher) for Netware.The process required to install the Resources and TQServer is somewhat roundabout as installation is done from a client workstation and requires hand editing of a small number of files to complete the installation.
Once the installation is complete however, TQServer will be available to all client workstations. Use the Typequick CD to install the Typequick client components (see Workstation Installations).
Insert the Typequick CD into a CD-ROM drive on a Windows workstation and allow the install program to autorun (or run the program setup.exe in the root of the Typequick CD if the CD does not autorun).
Follow the panels in the install until the Selecting the Type of Installation panel is reached and choose the Network-Custom button before continuing to the next panel.
On the Choose Components panel make sure only the "Typequick Server" and "Typequick Resources" boxes are checked before proceeding to the next panel.
At this point the panel below should pop up:
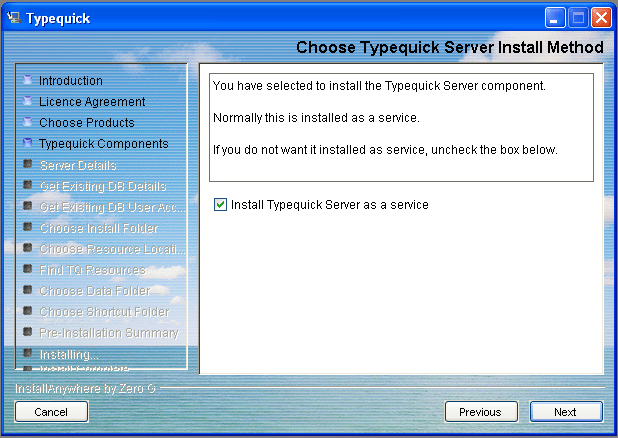
Uncheck the box (since the Typequick Server is not going to be operating on the workstation) before proceeding to the next panel.
When the panel asking for the server's TCP/IP address and port appears, the panel will put in the address of the workstation. The address should be replaced by the TCP/IP address of the Novell server where the Typequick server is to be run.
When the Choose Install Folder panel is reached, select a location on the Novell file server where you want the Typequick program to reside (this location is not going to be accessed by client workstations).
When the Choose Shortcut Folder panel is reached, select Don't create icons (since the Typequick server components are not going to be run from this workstation).
Continue through the panels till the installation completes.
There are three files which will need adjusting after the installation program has finished. They are tqinstall.properties, tqserverstart.ncf and tq.properties. The first two files should be in the installation folder, while the third should be in a sub-folder of the installation folder called volatile.
All of the changes involve replacing references to the installation folder from a Windows oriented reference (as seen from the workstation ) to references that are Novell centric. For instance, if the installation took place onto drive "N:\Typequick" (as seen from the workstation) and on the Novell server the same location is referred to as "sys:Typequick", then all references to "N:\Typequick" would be replaced by "sys:Typequick".
Two lines need to be altered. These lines begin with "VolatileDataFolder=" and "JDBCDirectory=". In both cases the Windows style drive and folder needs to be replaced by the correct Novell style reference.
Four lines need to be altered. These lines begin with "JDBCdbURL=", "Resources=", "VolatileDataFolder=" and "InstallFolder=". Again, just as for the previous file, the Windows style drive and folder needs to be replaced by the correct Novell style reference.
There is one line that needs to be altered. There are three references to the install folder on the line at the bottom of the file that begins with "java ". The three references to the Windows style drive and folder need to be replaced by the correct Novell style reference.
Add a reference to the TQServerStart.ncf file in the Novell server's startup script (autoexec.ncf) to make sure the Typequick Server is launched whenever the Novell Server is rebooted. Two lines should be inserted into the startup script (the example lines below assume the Typequick files have been placed at sys:Typequick)
search add sys:Typequick
tqserverstart.ncf
If you are not planning to reboot the Novell server in the immediate future, run the TQserverStart.ncf file now to force the Typequick server to start.
TQAdmin provides an option to make the client program silently log in to the Typequick server using the user's login ID at the workstation.
Normally, the client program uses the DOS variable "USERNAME" to get the user's login ID.
However, in some situations it maybe necessary to use the DOS variable "NWUSERNAME" in preference to "USERNAME".
This can be achieved by altering the entry "DOSUserName=USERNAME" in the tq.properties files after installing at a workstation. The new entry should be "DOSUserName=NWUSERNAME". The entry is case sensitive.